diumenge, 27 d’abril del 2014

DIDIBARO

Us presento la meva primera creació, un DIDIBARO, si en vols un, posa't en contacte amb mi a través del formulari del blog.

______________________________________

I want to introduce you my first creation, a DIDIBARO, if you want one, please fill the form and send me a message. 


dijous, 30 de gener del 2014

Puf de trapillo / Fabric yarn puff


Aquí teniu el puf marca de la casa, és el tercer que faig i la veritat és que cada cop els faig més ràpid i millor. Mentre l'anava fent, escrivia el patró per a poder compartir-lo al blog.
Aquest patró val per recobrir el farciment que venen a Duduà, amb trapillo de gruix estàndard i un ganxet de 15mm.
He escollit el vermell, el verd i el marró perquè era un encàrrec, però vosaltres podeu triar els colors que us agradin més.


Abreviatures:
pb: punt baix
augm: fer 2 punts baixos en el mateix punt base
dism: el més fàcil és saltar un punt de base

Ho trobareu molt ben explicat a la Guía para Tejer Bien 

Comencem fent 6pb en anell magic amb el color 1
V1: "1 augm" repetir "" fins a 12pb
V2: "1 augm + 1pb" repetir "" fins a 18pb
V3: "1 augm + 2pb" repetir "" fins a 24pb
V4: "1 augm + 3pb" repetir "" fins a 30pb
V5: "1 augm + 4pb" repetir "" fins a 36pb
V6: "1 augm + 5pb" repetir "" fins a 42pb
V7: "1 augm + 6pb" repetir "" fins a 48pb
V8: "1 augm + 7pb" repetir "" fins a 54pb
V9: "1 augm + 8pb" repetir "" fins a 60pb
V10: "1 augm + 9pb" repetir "" fins a 66pb
V11: "1 augm + 10pb" repetir "" fins a 72pb
V12: "1 augm + 11pb" repetir "" fins a 78pb
V13: "1 augm + 12pb" repetir "" fins a 84pb
Canviem al color 2
V14: "1 augm + 13pb" repetir "" fins a 90pb
V15-V26: 90pb
Canviem al color 3
V27-V28: 90pb
V29: "1 dism + 13pb" repetir "" fins a 84pb
V30: "1 dism + 12pb" repetir "" fins a 78pb
V31: "1 dism + 11pb" repetir "" fins a 72pb
V32: "1 dism + 10pb" repetir "" fins a 66pb
V33: "1 dism + 9pb" repetir "" fins a 60pb
V34: 60pb
V35: "1 dism + 8pb" repetir "" fins a 54pb
V36: "1 dism + 7pb" repetir "" fins a 48pb
V37: "1 dism + 6pb" repetir "" fins a 42pb
V38: "1 dism + 5pb" repetir "" fins a 36pb
V39: 36pb (en aquest punt pot ser que se'ns acabi el color 3, podem fer servir un color 4 o repetir el 1 o el 2)
V40: "1 dism + 4pb" repetir "" fins a 30pb
V41: "1 dism + 3pb" repetir "" fins a 24pb
V42: "1 dism + 2pb" repetir "" fins a 18pb
V43: "1 dism + 1pb" repetir "" fins a 12pb
V44: "1 dism" repetir "" fins a 6pb
Rematar amb un punt ras.

____________________________________

Here is my trademark puff, it's the third I've made and the truth is that I make them faster and better. While I was crocheting, I wrote the pattern to share it on my blog. 
To apply this pattern, we have to buy the puff filling from Dudua, use standard fabric yarn and a 15mm crochet hook. I chose red, green and brown because it was an order , but you can choose the colors you prefer.

Abbreviations:
sc: single crochet
Inc: 2 single crochet in the same base crochet
Dec: the easy way to decrease is to jump one single crochet

To start, we make a magic ring and do 6 single crochet with color 1
V1: "1 inc " repeat "" to 12sc
V2: "1 inc + 1sc" repeat "" to 18sc
V3: "1 inc + 2sc" repeat "" to 24sc
V4: "1 inc + 3sc" repeat "" to 30sc
V5: "1 inc + 4sc" repeat "" to 36sc
V6: "1 inc + 5sc" repeat "" to 42sc
V7: "1 inc + 6sc" repeat "" to 48sc
V8: "1 inc + 7sc" repeat "" to 54sc
V9: "1 inc + 8sc" repeat "" to 60sc
V10: "1 inc + 9sc" repeat "" to 66sc
V11: "1 inc + 10sc" repeat "" to 72sc
V12: "1 inc + 11sc" repeat "" to 78sc
V13: "1 inc + 12sc" repeat "" to 84sc
Change the color 2
V14: "1 inc + 13sc" repeat "" to 90sc
V15 - V26: 90sc
Change the color 3
V27 - V28: 90sc
V29: "1 dec + 13sc" repeat "" to 84sc
V30: "1 dec + 12sc" repeat "" to 78sc
V31: "1 dec + 11sc" repeat "" to 72sc
V32: "1 dec + 10sc" repeat "" to 66sc
V33: "1 dec + 9sc" repeat "" to 60sc
V34: 60sc
V35: "1 dec + 8sc" repeat "" to 54sc
V36: "1 dec + 7sc" repeat "" to 48sc
V37: "1 dec + 6sc" repeat "" to 42sc
V38: "1 dec + 5sc" repeat "" to 36sc
V39: 36sc (at this point we might finish the third color, we can use a fourth color or repeat colors one and two)
V40: "1 dec + 4sc" repeat "" to 30sc
V41: "1 dec + 3sc" repeat "" to 24sc
V42: "1 dec + 2sc" repeat "" to 18sc
V43: "1 dec + 1sc" repeat "" to 12sc
V44: "1 dec" repeat "" to 6sc
Close with a slip stitch.

dimecres, 22 de gener del 2014

Dimoniet d'Amigurumi / Amigurumi Demon

Dimoniet acabat! Del llibre "Monstruillos de Ganchillo". No ha quedat tant grassonet com el del llibre pel tipus de fil utilitzat, ja que el del llibre està fet amb fil de cotó i un ganxet de 3mm i jo l'he fet amb un fil de cotó una mica més prim i un ganxet de 2,5mm.


Little demon is done! From the book "Monstruillos de Ganchillo". The one from the book is much fat as mine because of the type of yarn used. I have done it with cotton thread much thinner that the book one and also the crochet was 2,5 mm instead the 3 mm from the book.

Peppermint Beanie

Aquest és el gorrito que vaig fer amb el kit que em vaig comprar a la web de We Are Knitters. A dins del pack et ve, una troca de 200 grams de llana peruana 100%, un ganxet de fusta de 15mm, el patró, una agulla llanera i un full d'enganxines. 
Ja havia practicat el patró amb trapillo com podeu veure en aquest post, però aquest és el definitiu.


_______________________________

This is the crocheted hat I made with the kit I bought from We Are Knitters web store. Inside the pack you can find a skein of 200 gr. of 100% Peruvian wool, a 15mm wood crochet, the pattern, a wool needle and a paper sheet full of stickers. 

I Had practiced the pattern with the t-shirt yarn as you can see in this post, but this is the original one.(See pictures above)

dilluns, 6 de gener del 2014

El repte Amigurumi, part II

Tal i com he publicat al meu tumblr, m'han proposat un nou repte, fer 20 monstruets d'amigurumi. Són una mica més senzills que els robots perquè tenen menys detalls. De fet, he començat a fer el primer monstre, el dimoni.


____________________________________________

As I have posted in my Tumblr, my family proposed me another challenge, to make 20 amigurumi monster. They are a little bit easier than the robots because they have less decorations. In fact, I've started with the first monster, the demon. (as you can see in the pictures above).

dissabte, 14 de desembre del 2013

El repte Amigurumi


A partir de Gener de 2014 començaré a fer un a un els 20 robots amigurumi del llibre, tal i com anuncio al meu Tumblr.


diumenge, 24 de novembre del 2013

Barret amb orelles de ratolí / Beanie with mouse ears

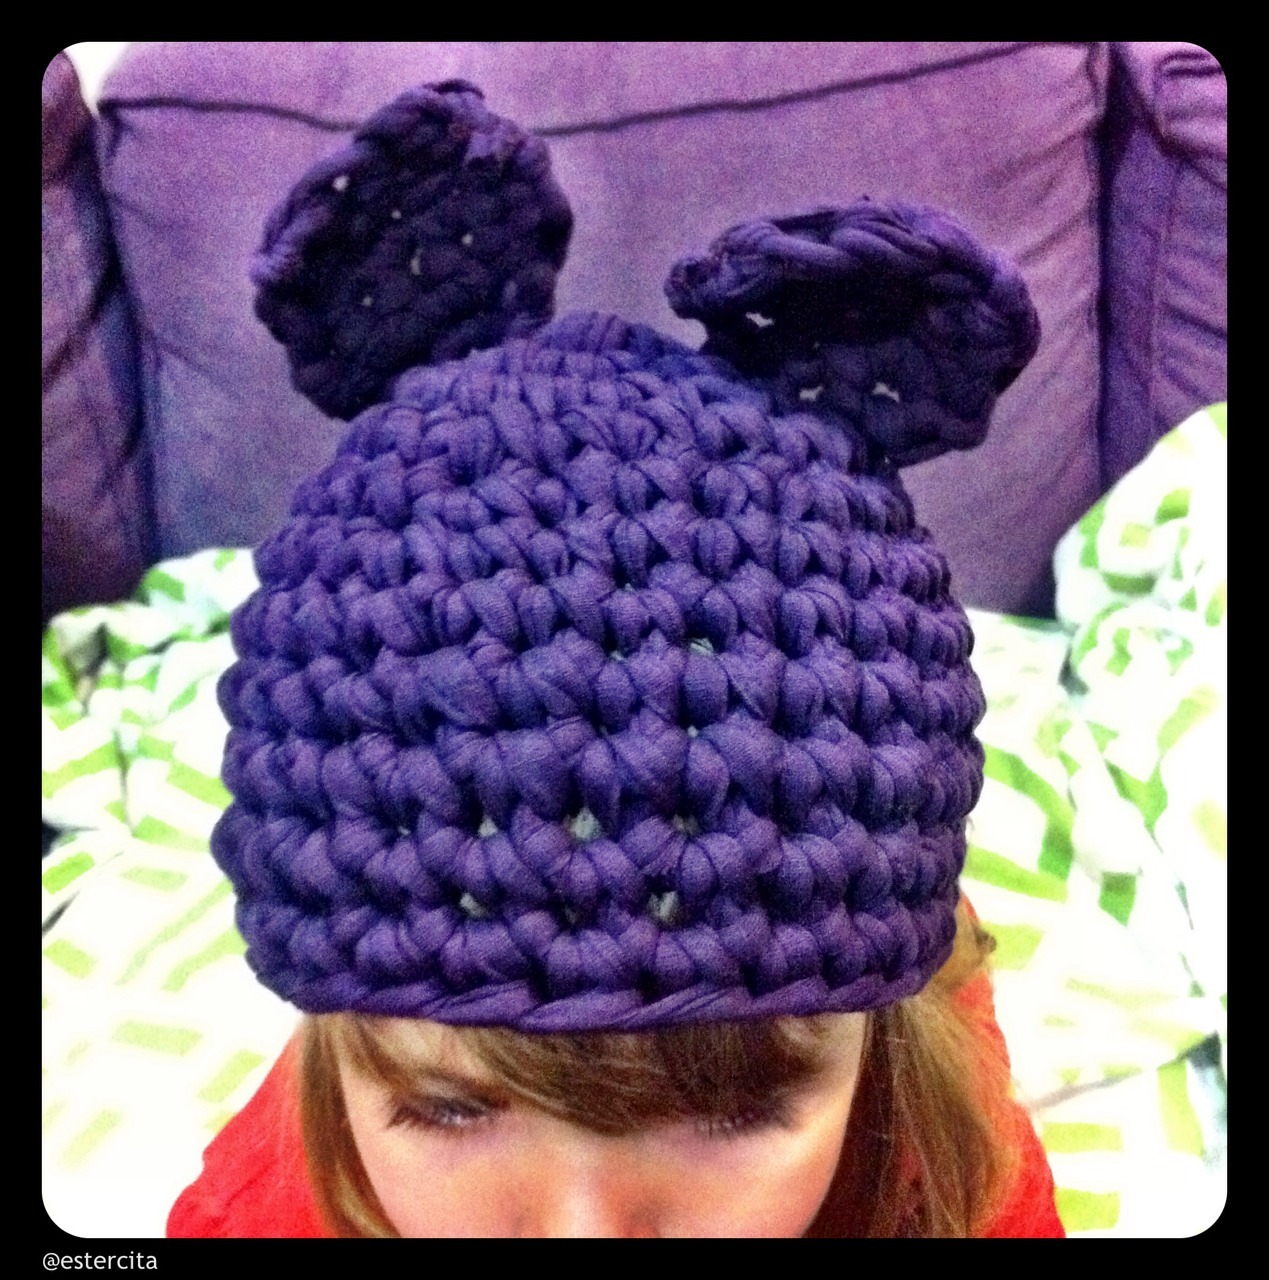
Hola, avui us porto el patró d'un barret amb orelles de ratolí (de mickey mouse) adaptat del model "Peppermint beanie" de la pàgina de We Are Knitters.
Necessiteu aproximadament mitja troca de trapillo i un ganxet del 10-12 en funció del gruix de la tela.


-Abreviatures del patró:
Cadeneta: cd
Punt ras: pr
Punt baix: pb
Augment: 2pb sobre el mateix pb
Reducció: 1pb sobre 2pb de la fila inferior

BARRET

Pas 1: Fer 4 cadenetes (cd) i tancar el cercle amb un punt ras (pr) en la primera cadeneta, fer una cadeneta.
Pas 2: Fer 6 punts baixos (pb) en el cercle creat en el pas anterior. Tancar amb 1 pr i 1 cd
Pas 3: Fer 2 pb (1 augment) a cada punt, fins a 12 pb. Tancar amb 1 pr i 1 cd

Pas 4: Fer 1 pb + 1 augment (2pb en 1 punt) fins a 18 pb. Tancar amb 1 pr i 1 cd
Pas 5: Fer 4pb + 1 augment, repetir fins a 22 pb. Tancar amb 1 pr i 1 cd
Pas 6: Fer 3pb + 1 augment, repetir fins a 28 pb. Tancar amb 1 pr i 1 cd
Pas 7: Fer 6pb + 1 augment, repetir fins a 32 pb. Tancar amb 1 pr i 1 cd
Pas 8: Fer 5 voltes de 32 pb (1pb en cada punt), tancant cada volta amb 1 pr i 1cd. Rematar.

ORELLES (x2)

Pas 1: Fer 3 cd
Pas 2: 1 cd + 3pb (3 punts)
Pas 3: 1 cd, 1 augment, 1 pb, 1 augment (5 punts)
Pas 4: 1 cd, 5pb (5 punts)

Pas 5: 1cd, 1 reducció, 1 pb. 1 reducció (3 punts). Rematar.

Finalment, heu de cosir les orelles al barret amb la mateixa tela i una agulla llanera.

Trobareu les fotos al Tumblr.

_______________________________________
Hi, today I will show you the beanie with mouse ears pattern (see picture on top) (as Mickey Mouse ) which is adapted from the " Peppermint Beanie" that can be found in http://www.weareknitters.com

You need about half a skein of t-shirt yarn and a 10-12mm crochet hook.

Abbreviations - pattern :
Chain : ch
Slip Stitch: ss
Single crochet: sc
Increase : 2sc on the same sc
Reduction : 1sc on 2sc from the last row

BEANIE

Step 1: Make 4 chains (ch) and close the cirle with a slip stitch (ss) in the first chain, make another chain.
Step 2: Make 6 single crochet (sc) in the circle created in the previous step. Close the round with 1ss and 1 ch.
Step 3: Make 2sc (1 increase ) at each point, up to 12sc . Close the round with 1ss and 1 ch.
Step 4 : Make 1sc + 1 increase (2sc in 1 sc) and repeat it up to 18sc. Close the round with 1ss and 1 ch.
Step 5 : Make 4sc +1 increase, repeat up to 22sc. Close the round with 1ss and 1 ch.
Step 6 : Make 3sc +1 increase, repeat up to 28sc. Close the round with 1ss and 1 ch.
Step 7 : Make 6sc +1 increase, repeat up to 32sc. Close the round with 1ss and 1 ch.
Step 8 : Make 5 rounds of 32sc (1sc at each point), closing every round with 1ss and 1 ch. 

EARS (x2)

Step 1 : Make 3ch
Step 2: 1ch+ 3sc (3 points )
Step 3: 1ch + 1increase + 1sc + 1 increase (5 points)
Step 4: 1ch + 5sc (5 points)
Step 5: 1ch + 1 reduction + 1 sc + 1 reduction (3 points)

In the end, you have to attach the ears to the beanie using the same t-shirt yarn and a wool needle.

You can find the pictures on my Tumblr .